Managing Client Lists
To make sure your client list is successfully imported, it must be formatted according to the provided template. However, if your lists are formatted differently, they can be easily adjusted to match the required format.
- Making sure the columns have the correct names
- Splitting text to different columns
- Merging the text from different columns
- Formatting phone numbers
Making sure the columns have the correct names
Please check the column names in your client list: they must be exactly the same as given in the template:

You can add just 1 phone number and leave other phone number columns blank, it's not mandatory to fill out all 3 numbers for a contact.
If there's a blank space or a symbol missing (for example, FirstName, Email Address, Phone), or there's an extra symbol (for example, Last Names), or you won't be able to upload your contact list.
Splitting text to different columns
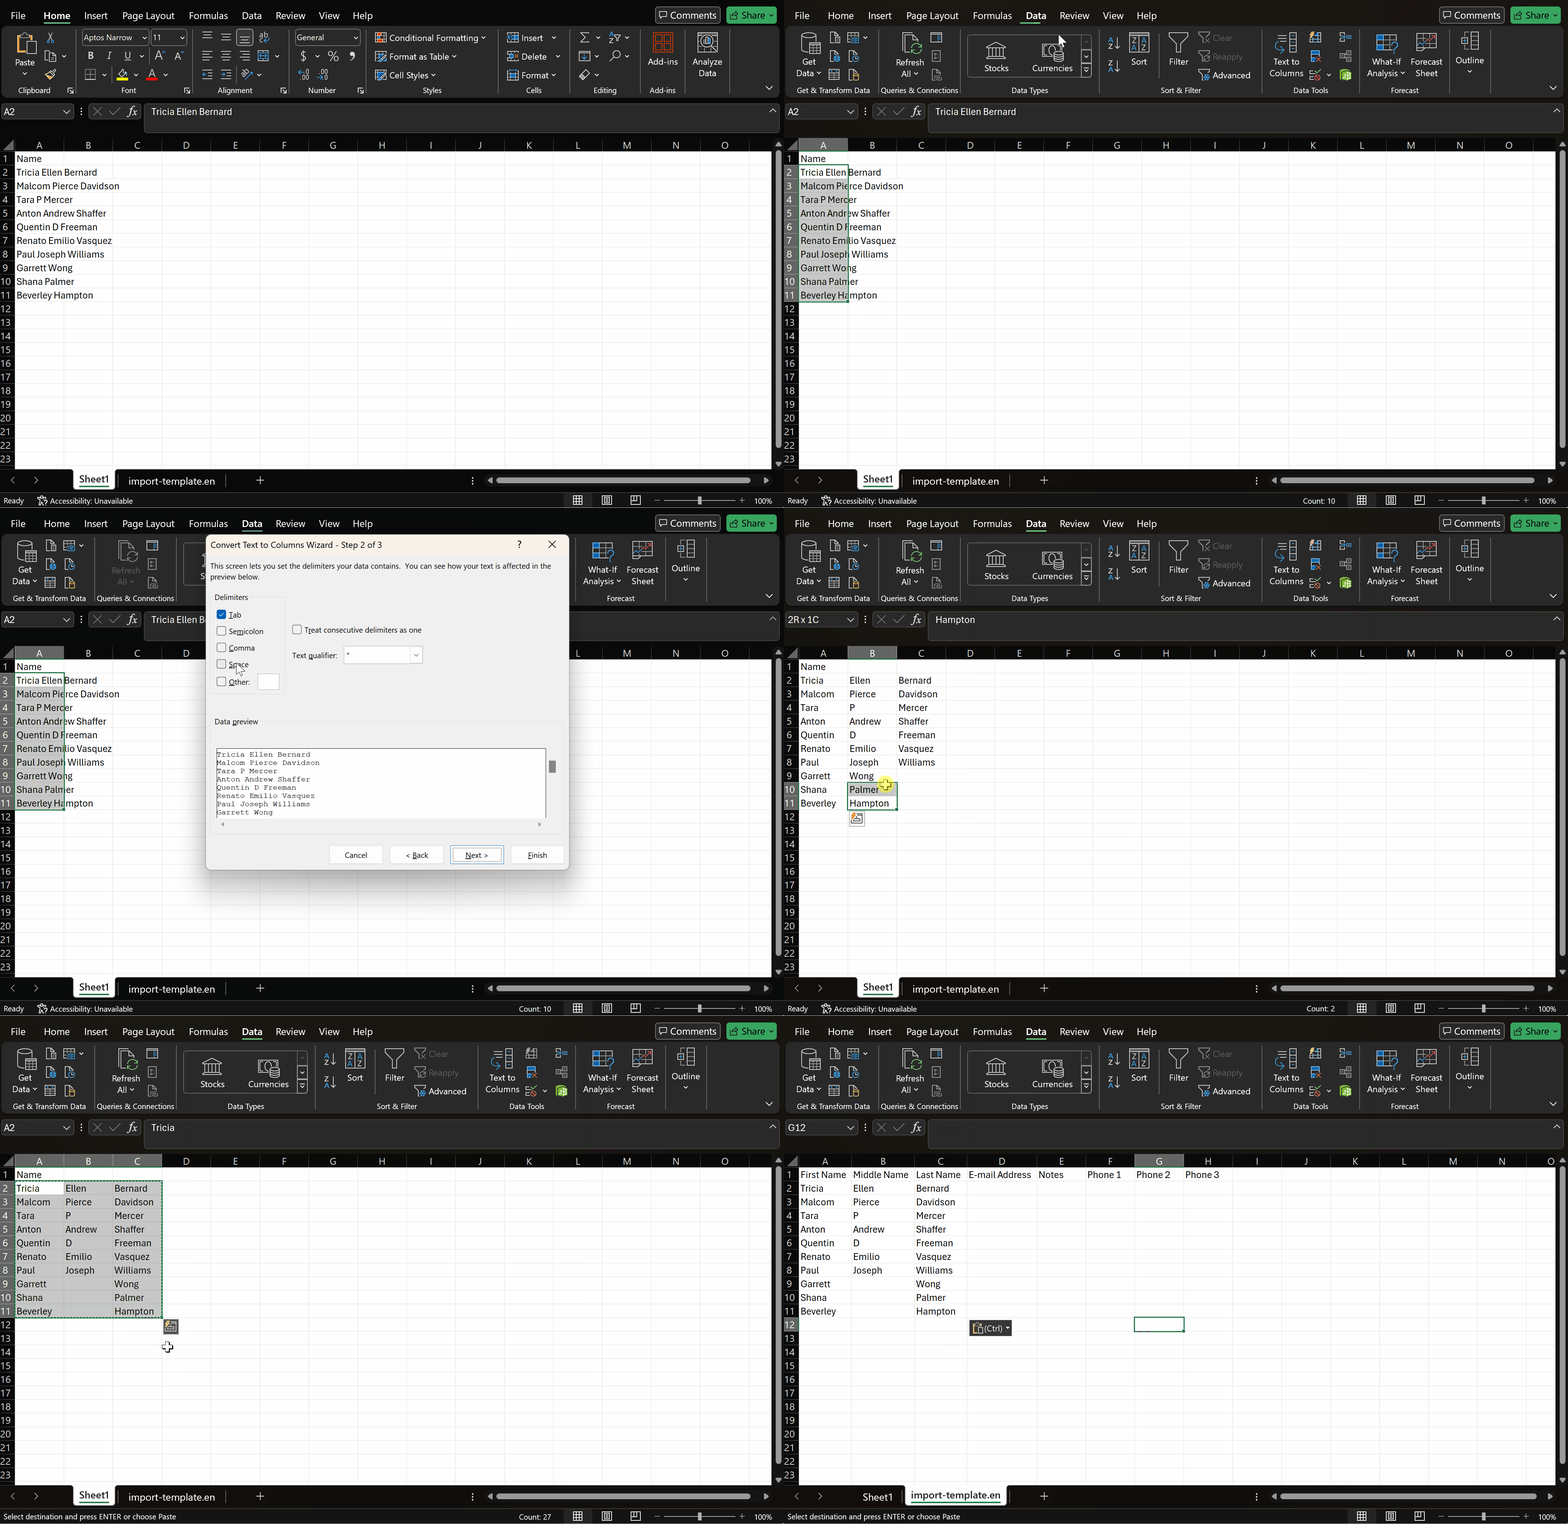
Sometimes you need to split the text from cells containing the full names of your contacts to different columns for their first, middle and last names.
To do that, please do the following in your Excel file with the client list:
- Select the cell or cells whose contents you want to split.
- Go to Data → Data Tools → Text to Columns.
- Select the delimiter to define the places where you want to split the cell content (in our case, that's Space), and then select Apply.
Important: When you split the contents, they will overwrite the contents in the next cell to the right, so make sure to have empty space there.

In the example above, we have both the contacts with and without a middle name or initial. For the contacts without a middle name, you can simply move their last names to the column
Merging the text from different columns
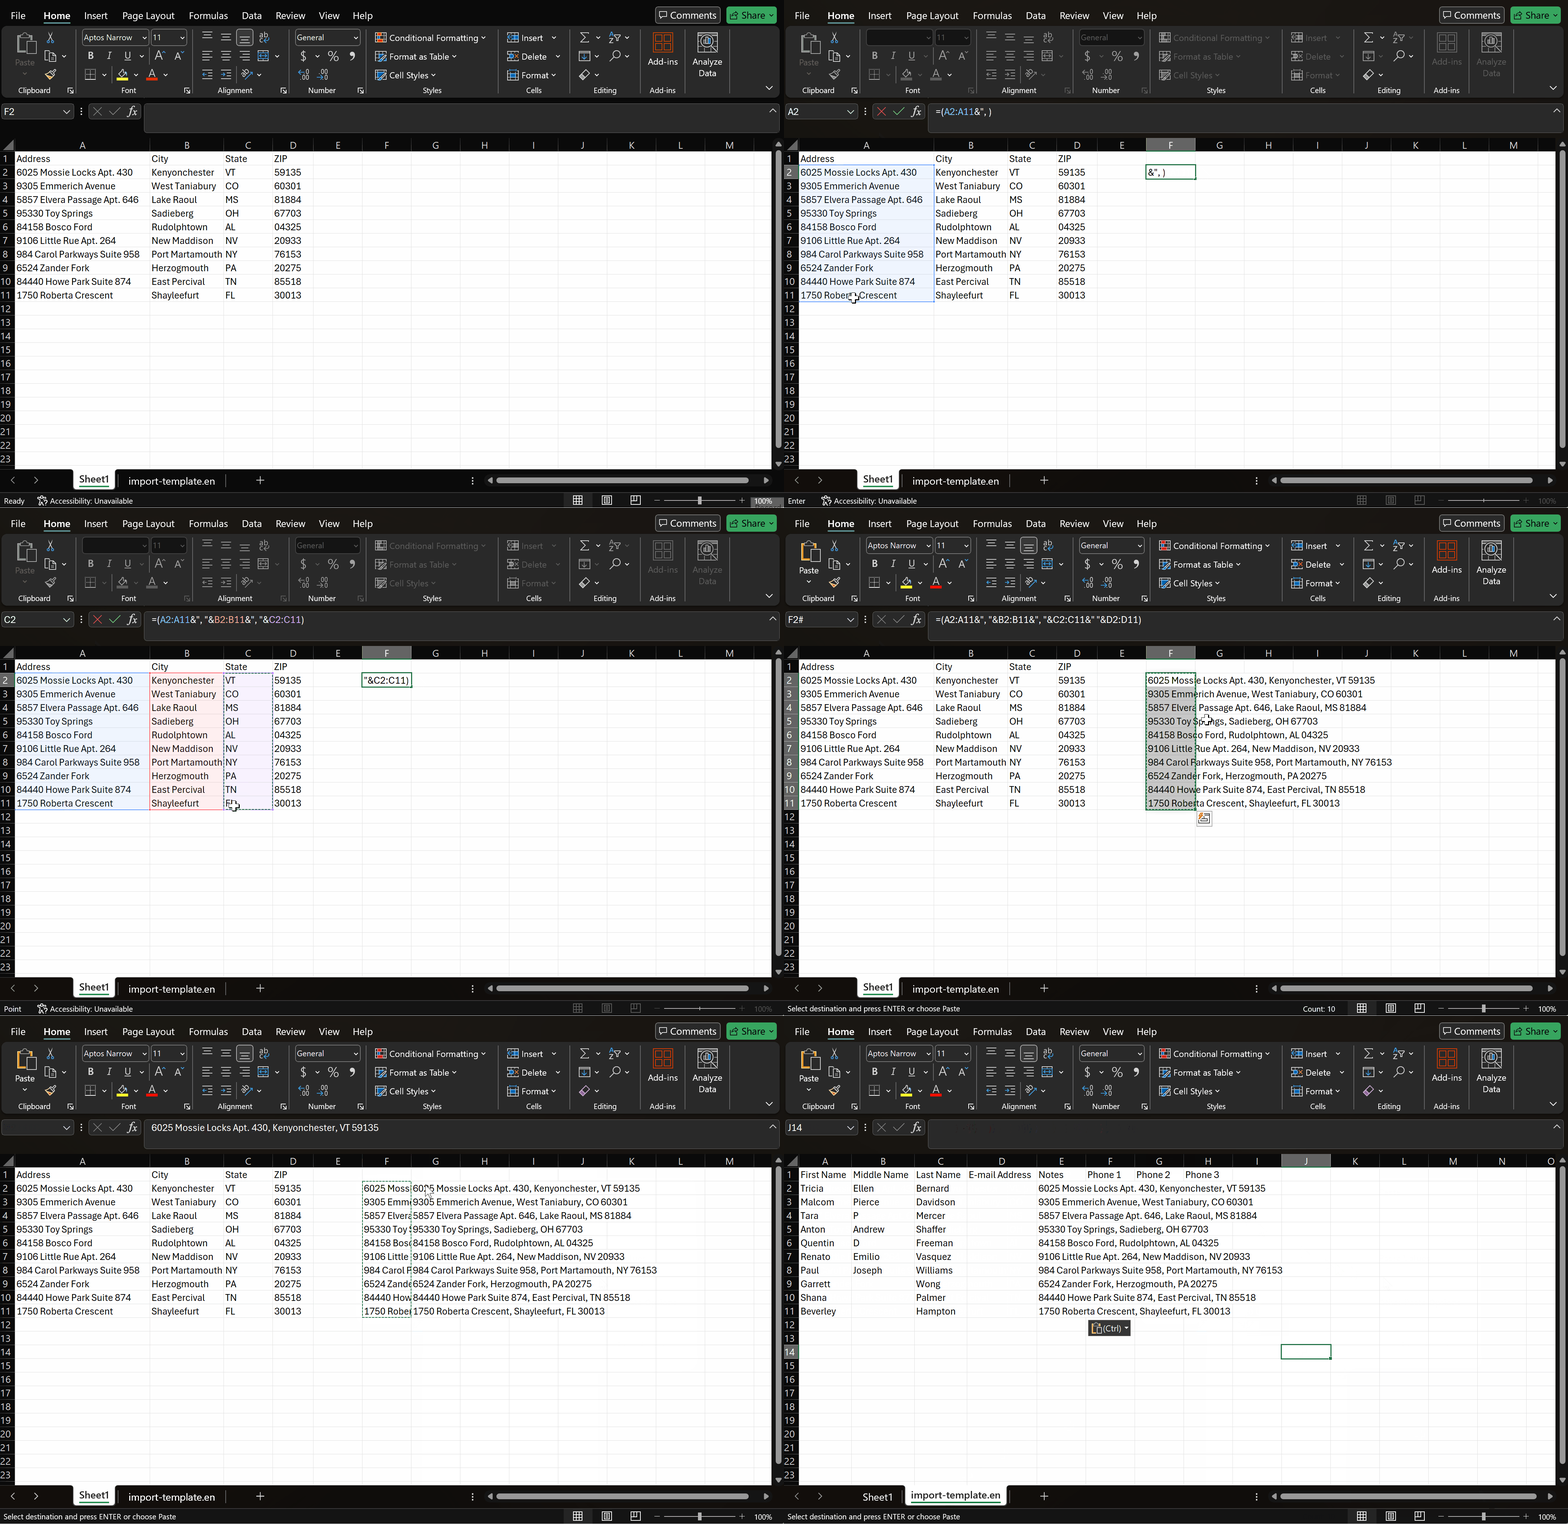
If you need to merge the text from different columns into one: for example, to put the street address, city, state & ZIP code into the Notes for your contacts, you can do it with the help of Excel formulas.
Let's add addresses for the contacts from the previous section! And we will also add commas and blank spaces for the better view:
- Go to the cell in the new column you'd like to start showing the merged texts in.
- In the Excel formula field type
=()to set up the start and the end of your formula, then put your cursor between the parentheses. - Select the cells in the first column with the text (Address), you should see the cell range appear in your formula like this:
=(A2:A11) - Then add
&to be able to add another element to the formula. - Add
", "to put after the text selected in your first column. - Then add
&and select the text from the second column to be added (City). - Add
", "to put after the text selected in your second column. - Now add
&and select the text from the third column to be added (State). - Add
" "to put after the text selected in your third column. - Finally, select the text from your fourth column (ZIP) and press Enter.
The final formula will look like this: =(A2:A11&", "&B2:B11&", "&C2:C11&" "&D2:D11)
You should see the text from all 4 columns merged nicely for you.

However, this text isn't set in stone, and if you change or delete something in the originating columns, it will change or disappear. To save it, click to copy the text, then select to Past Special → Paste Values in the next column.
Once you've pasted it, copy the newly pasted text and paste it into the Notes column in your list.
Formatting phone numbers
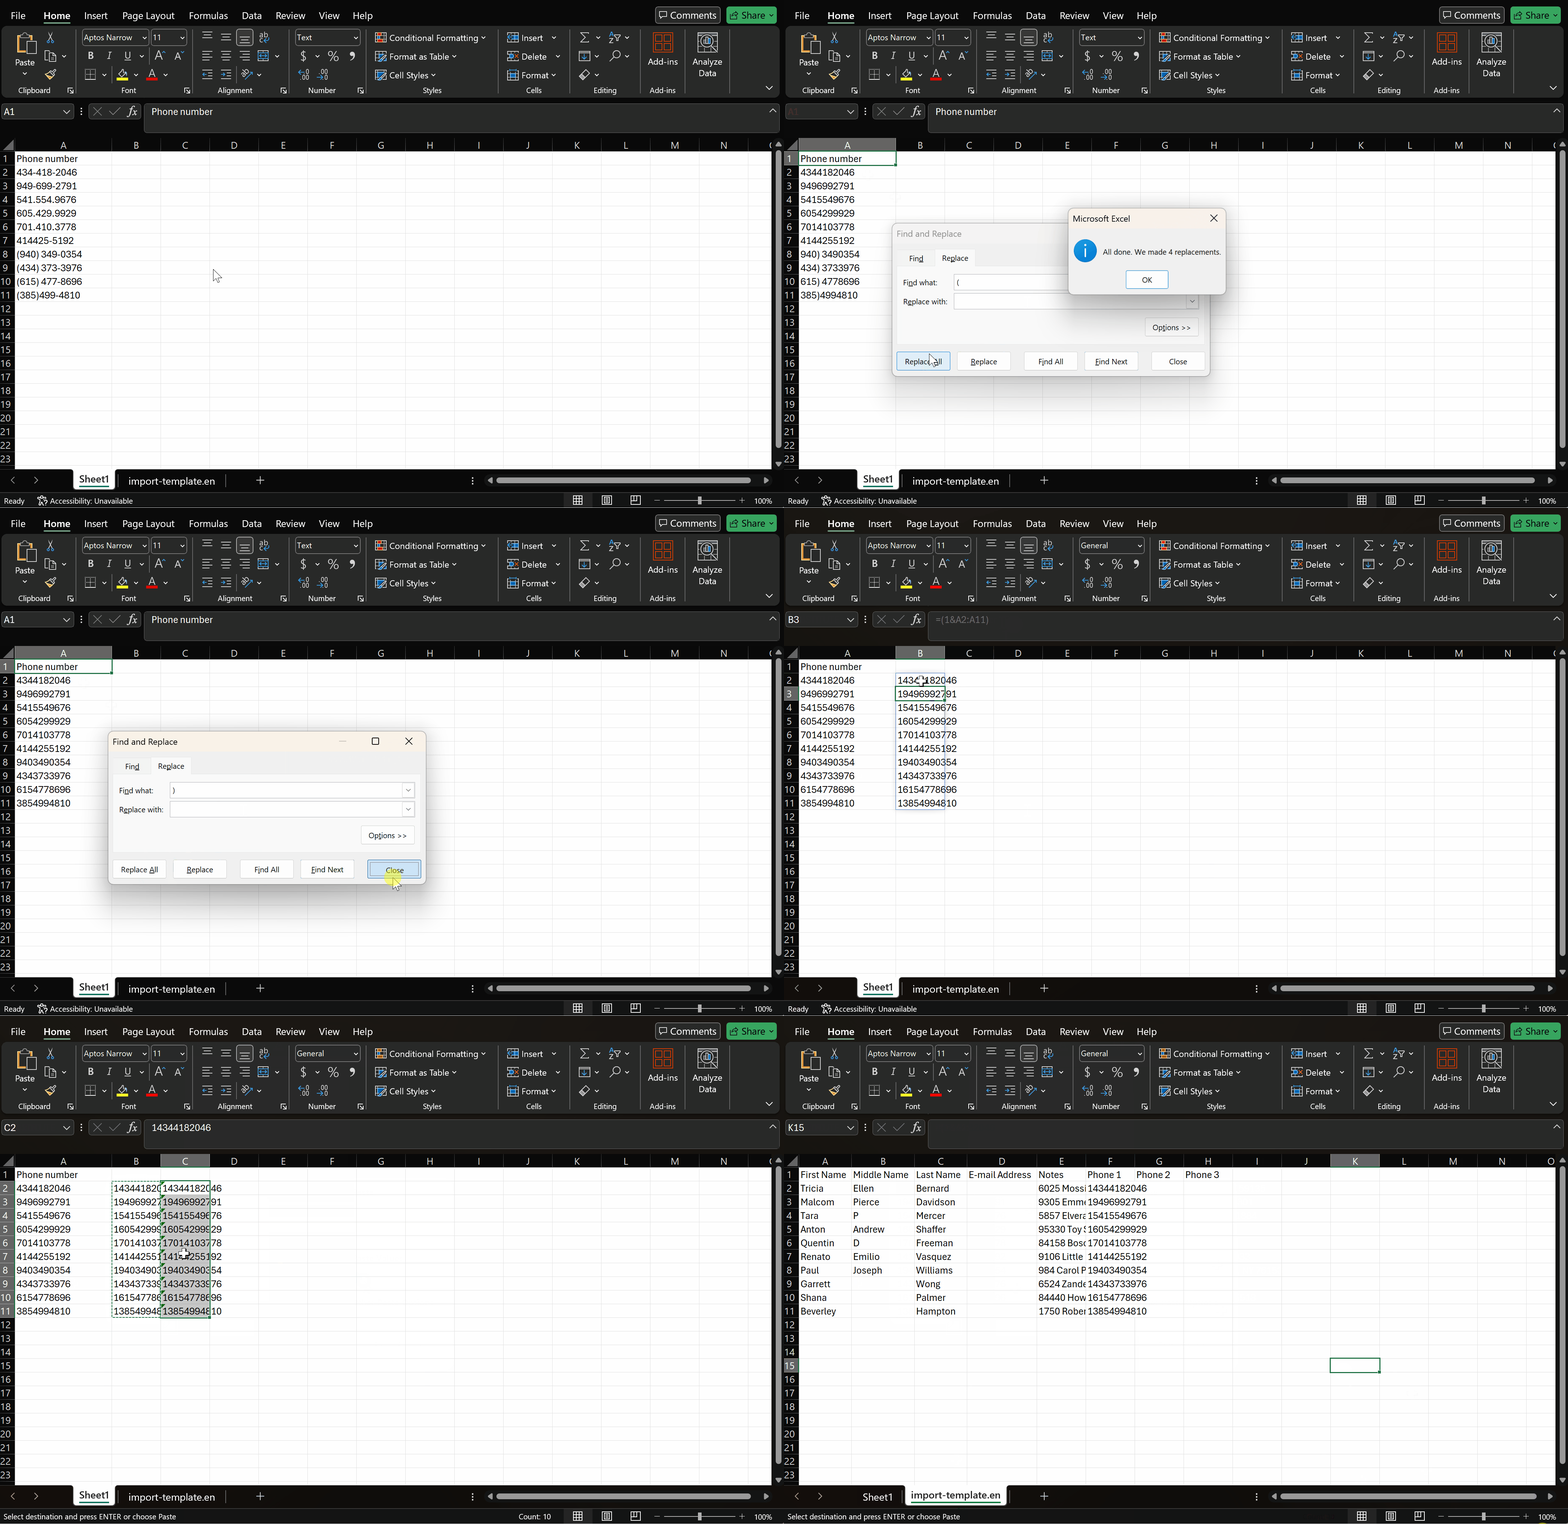
Phone numbers in the lists must be in the 1XXXXXXXXXX format: for example, 18887776543. If your phone numbers include hyphens, dots, parentheses or blank spaces, or they don't start with the country code 1, you won't be able to upload them in the list.
However, you can easily format your numbers in Excel:
- Click Ctrl + H, enter - in the field Find what: and don't put anything in the field Replace with: to remove hyphens.
- Click Ctrl + H, enter . in the field Find what: and don't put anything in the field Replace with: to remove periods.
- Click Ctrl + H, enter ( in the field Find what: and don't put anything in the field Replace with: to remove starting parentheses.
- Click Ctrl + H, enter ) (or ) followed by a blank space) in the field Find what: and don't put anything in the field Replace with: to remove ending parentheses.

Once you've removed the extra symbols from your numbers, you can add 1 to them:
- Go to the cell in the new column you'd like to start showing the merged texts in.
- In the Excel formula field type
=(1&A2:A11)to add 1 to a range of cells with your phone numbers and press Enter. - Just like before, you will need to copy the resulting numbers and Past Special → Paste Values to be able to add them to your client list.
If you're seeing an error message here because of numbers stored as text, please make sure that you choose the Convert to Number option.
As a result, you should have a perfectly formatted client list that can be uploaded to your campaign.